
From Dockerfile to Registry — Your First Real Docker Build
The hands-on guide to writing Dockerfiles, building images, and shipping containers.

In Part 1, we explained the reasons behind Docker: how environment mismatches silently break deployments, and how Docker packages your code and its environment into a single, portable unit. We explored the three kernel features that power containers — namespaces, cgroups, and OverlayFS — and nailed down the mental model that an image is a read-only blueprint while a container is a running instance of it.
Now it’s time to put that understanding to work. In this post, you’ll learn every Dockerfile instruction, containerize a real FastAPI application from scratch, master Docker’s layer caching strategy, debug running containers, and push your image to a registry.
The Dockerfile — Your Build Instructions
A Dockerfile specifies the sequence of instructions for assembling a Docker container image, with nearly every instruction creating an immutable layer for efficient reuse and caching.
Here’s a quick-reference cheat sheet of every instruction — we’ll break down the important ones in detail below.
FROM— Sets the base image for the buildRUN— Executes a command and commits the result as a new layerCOPY— Copies files from your project into the imageADD— LikeCOPY, but also extracts tar archives and supports remote URLsCMD— Default arguments passed to the container’s entrypoint at launchENTRYPOINT— The executable that runs when the container startsENV— Sets environment variables for build and runtimeARG— Sets build-time-only variables (not available at runtime)WORKDIR— Sets the working directory for subsequent instructionsEXPOSE— Declares which port the container listens onUSER— Sets the non-root user the container runs as
LABELandVOLUMEexist too — we’ll cover them when they’re relevant in later parts.
Here’s a closer look at each one.
FROM — Where Everything Starts
FROM python:3.12-slim-bookwormEvery Dockerfile begins with FROM. It sets the base image — the starting point your application builds on. For Python projects, you generally have three choices:
python:3.12— Full Debian with build tools (~900MB). Use it if your dependencies require compiling C extensions.python:3.12-slim— Slimmed-down Debian (~150MB). Good enough for most applications.python:3.12-alpine— Alpine Linux (~50MB). Smallest, but many Python packages ship prebuilt binaries that aren’t compatible with Alpine’smusl libc. Use with caution.
python:3.12-slim-bookworm It is the sweet spot for most production Python services.
RUN — Executing Commands
RUN pip install --no-cache-dir -r requirements.txtRUN executes a command during the build and saves the result as a new image layer. This is where you install dependencies, compile code, and set up your environment.
Two things worth knowing:
Every
RUNcreates a layer. Each layer adds to your image size — even if a later step deletes the files. We’ll cover how to keep images lean in a future post on multi-stage builds.Docker caches layers. If a
RUNinstruction hasn’t changed since the last build, Docker skips it and reuses the cached result. Fast rebuilds — but it also means Docker won’t pick up new package versions unless you change the instruction.
COPY — Bringing Your Files In
COPY . .COPY scoops up files from your project and drops them into the image.
There’s also ADD, which copies files, auto-extracts tar archives, and can fetch from URLs. In real-world Dockerfiles, prefer COPY — It’s explicit and predictable. Reserve ADD only for cases where you specifically need its extra capabilities.
CMD and ENTRYPOINT — Starting Your App
CMD defines the default command that runs when a container starts. It’s easy to override — docker run myimage python worker.py ignores the entire CMD and runs python worker.py instead.
There are two ways to write CMD, and the difference matters more than most people realize:
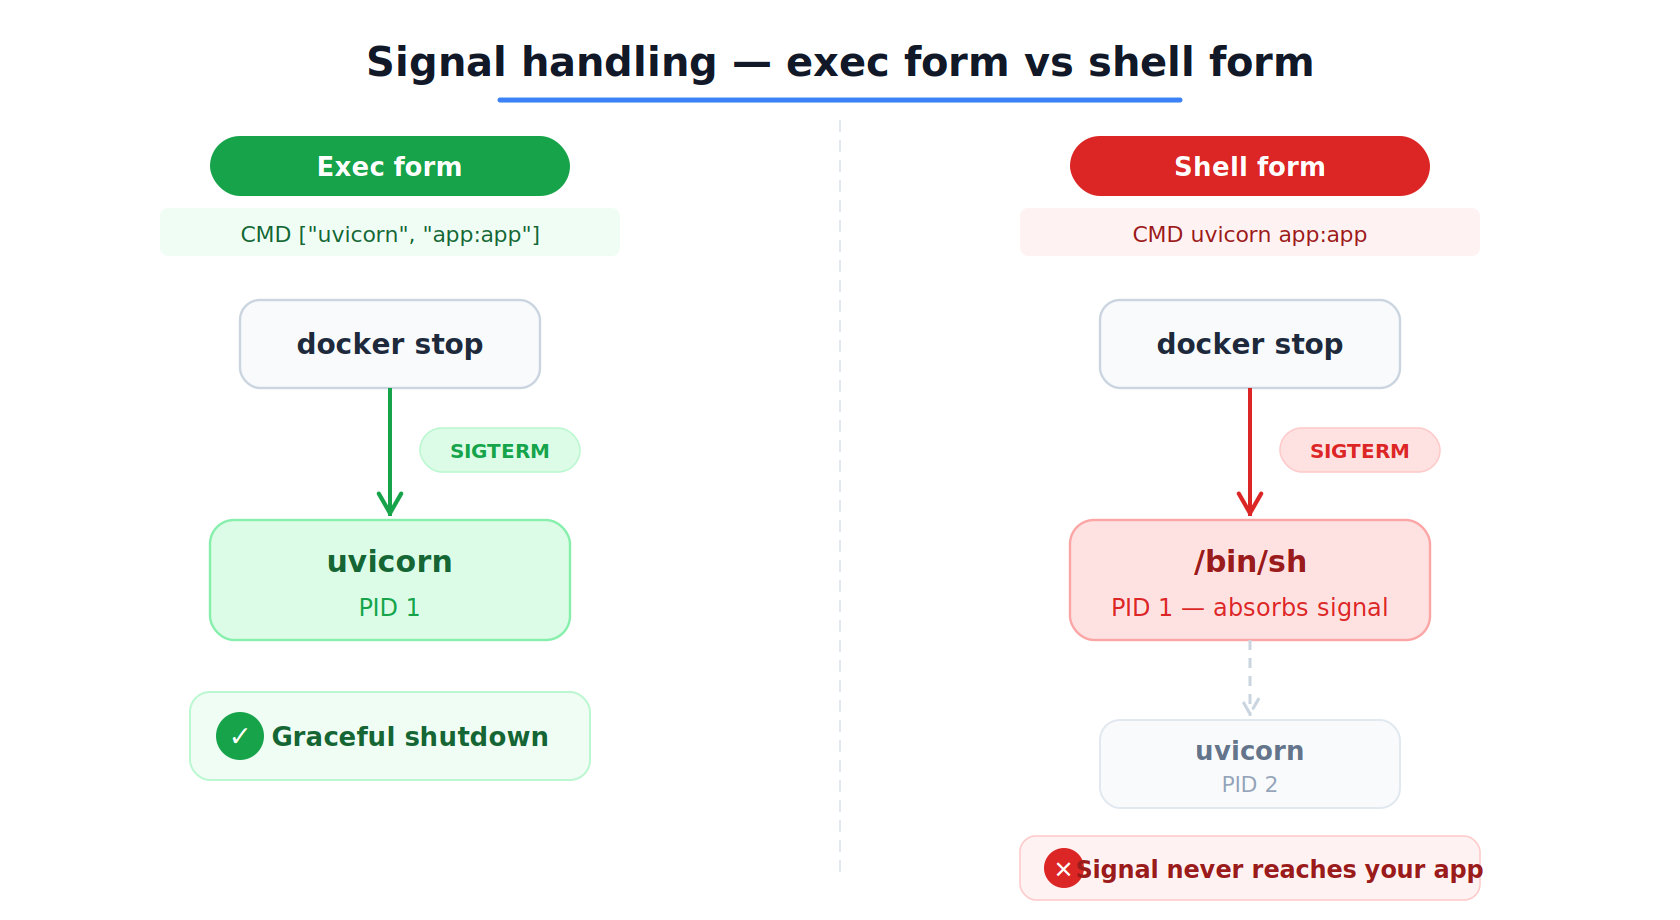
Exec form (use this):
CMD ["uvicorn", "app:app", "--host", "0.0.0.0", "--port", "8000"]The square bracket syntax is exec form. It runs your process directly as the main process inside the container (PID 1 — the first process the container sees). When you run docker stop, Docker sends a shutdown signal directly to your app. Graceful shutdown works exactly as expected.
Shell form (avoid this):
CMD uvicorn app:app --host 0.0.0.0 --port $PORTWithout the square brackets, Docker quietly wraps your command in /bin/sh -c, like this:
/bin/sh -c "uvicorn app:app --host 0.0.0.0 --port $PORT"Now the shell is the main process inside the container — not your app. Your app is running behind the shell.
This matters when you stop the container. docker stop sends a shutdown signal to the main process. The shell receives it, but it doesn’t pass it along to your app. Your app has no idea it’s supposed to stop.
After a 10-second timeout, Docker force-kills everything. No graceful shutdown — any work your app was doing at that moment just disappears.
The only reason to use shell form is when you need environment variable expansion at runtime (like $PORT). In every other case, exec form is the safer choice.
What about ENTRYPOINT?
Without an ENTRYPOINT, CMD is the full command Docker runs when the container starts. That’s the setup most Python applications need.
If you set an ENTRYPOINT, it becomes the fixed executable — and CMD just provides default arguments.
ENTRYPOINT ["python"]
CMD ["app.py"]
Now, when the container starts, Docker runs python app.py. But if someone runs:
docker run myimage worker.pyDocker replaces only the CMD part — so it runs python worker.py instead. The entrypoint (python) stays the same. Only the argument changed.
We’ll cover more advanced ENTRYPOINT patterns and signal handling in a future post.
ENV — Setting Environment Variables
ENV APP_ENV=productionSets variables available both during the build and when the container runs. Your application can read these with os.environ.get("APP_ENV").
There’s also ARG, which sets variables available only during the build — useful for version numbers or build-time configuration that shouldn’t persist into the final image.
WORKDIR — Setting the Directory
WORKDIR /appWORKDIR sets the working directory for everything that follows. If the folder doesn’t exist, Docker creates it for you. Always use WORKDIR instead of RUN cd /somewhere — cd only lasts for a single RUN step.
EXPOSE — Declares Ports
EXPOSE 8000EXPOSE signals that the container expects traffic on port 8000. Real port binding happens when you run the container with -p. Treat EXPOSE as built-in documentation for your Dockerfile.
USER — Not Running as Root
RUN groupadd --system appgroup && useradd --system --gid appgroup appuser
USER appuser
By default, containers run as root. That’s acceptable for development, but dangerous in production. If a vulnerability slips through, an attacker running as root can do far more damage. Switching to a non-root user is a small change with a meaningful security payoff.
Let’s Build Something Real
Enough theory — let’s roll up our sleeves and containerize a real application.
We’ll use a simple FastAPI server with uvicorn. Here’s the application:
# app.py
from fastapi import FastAPI

app = FastAPI()

@app.get(”/health”)
def health_check():
    return {”status”: “healthy”, “version”: “1.0.0”}

@app.get(”/”)
def root():
    return {”message”: “FastAPI running inside Docker”}
And the dependencies:
# requirements.txt
fastapi==0.115.0
uvicorn[standard]==0.30.0
First — Make Sure It Works Without Docker
Before containerizing anything, verify the app runs normally:
python -m venv venv
source venv/bin/activate
pip install -r requirements.txt
uvicorn app:app --host 0.0.0.0 --port 8000
Test it:
curl localhost:8000/health
# {”status”:”healthy”,”version”:”1.0.0”}
Rule of thumb: If your app fails outside Docker, it will fail inside Docker too. Docker guarantees consistency, not bug fixes.
The .dockerignore File
When you run docker build, Docker ships your whole project directory to the build engine. That means venv folders (200MB+), .git directories, __pycache__ files — all of it — unless you tell it otherwise.
Create a .dockerignore file:
__pycache__
*.pyc
.git
.gitignore
.env
Dockerfile
README.md
.vscode
.idea
This speeds up builds and keeps sensitive files — like .env with database passwords — out of your image, where they belong.
Writing the Dockerfile
FROM python:3.12-slim-bookworm

WORKDIR /app

COPY requirements.txt .
RUN pip install --no-cache-dir -r requirements.txt

COPY . .

EXPOSE 8000

CMD [”uvicorn”, “app:app”, “--host”, “0.0.0.0”, “--port”, “8000”]
It’s clean and straightforward, but one decision here makes all the difference.
Why do we copy requirements.txt separately before copying everything else?
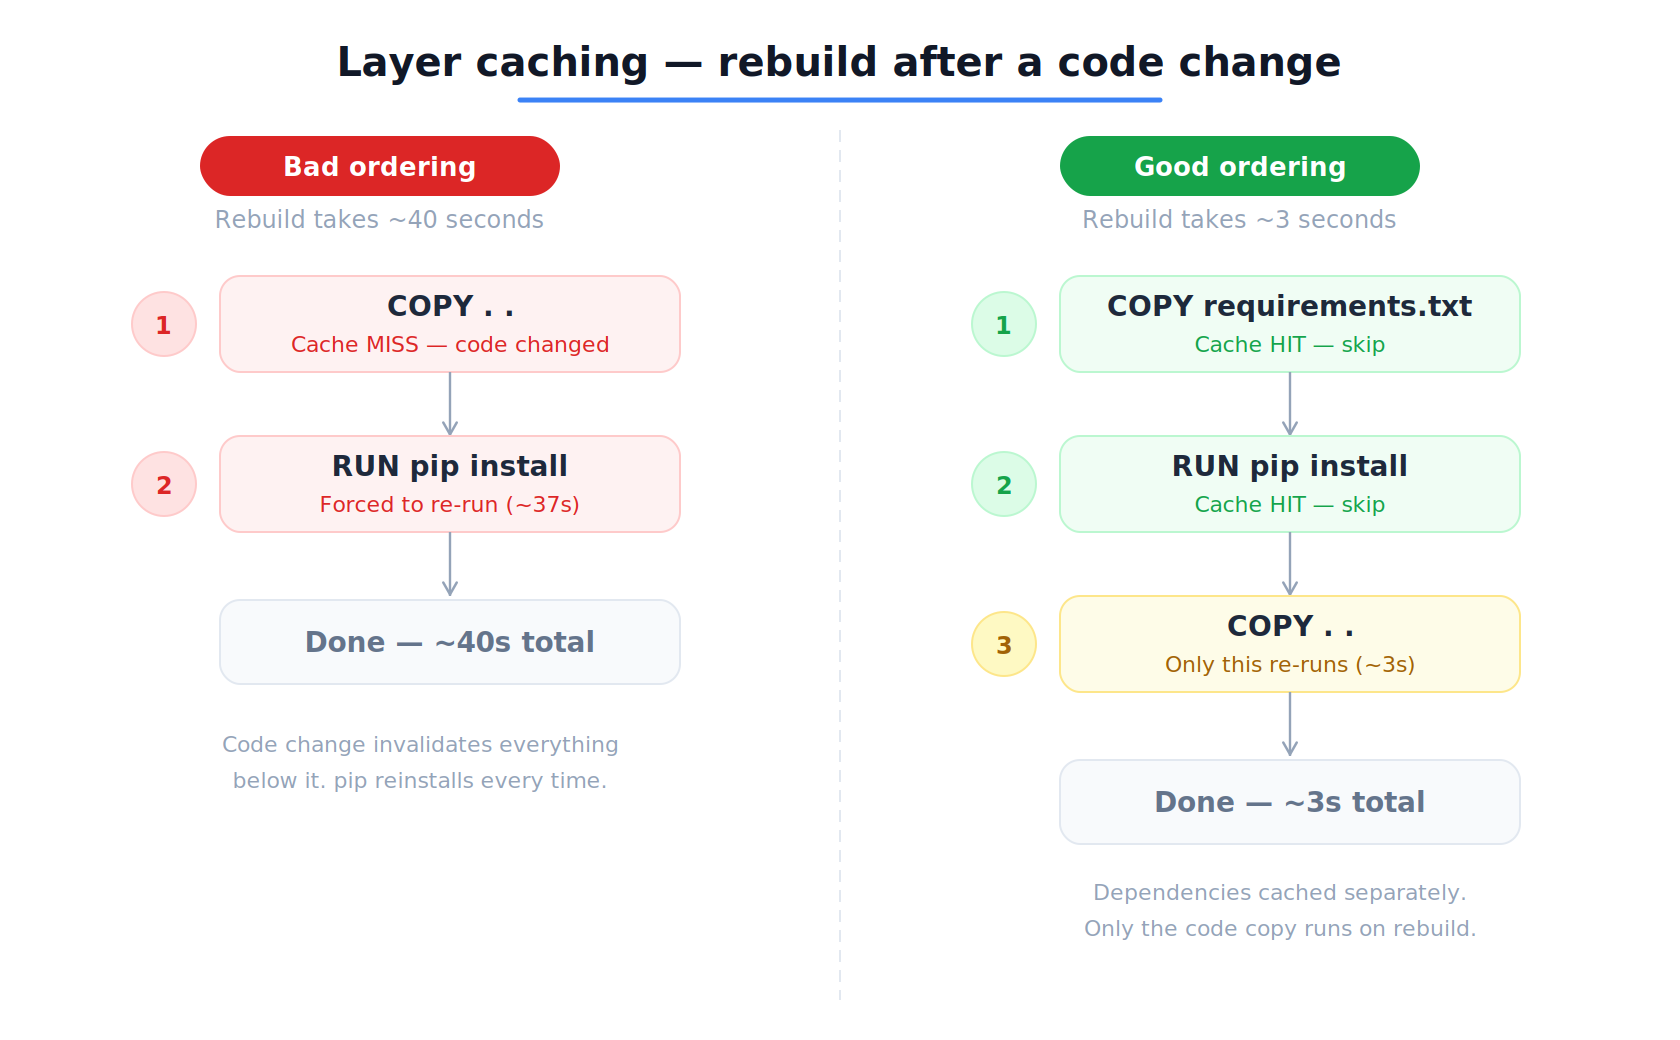
This is about Docker layer caching. Each instruction creates a layer. If the inputs to that layer haven’t changed, Docker reuses the cached version and skips re-executing it.
By copying only requirements.txt the first and running pip install, we create a cached layer for our dependencies. The next time we build, if we’ve only changed our Python code (not our dependencies), Docker skips the pip install step entirely.
Watch the difference:
# ❌ Bad ordering — a code change forces pip to reinstall every time
COPY . .
RUN pip install --no-cache-dir -r requirements.txt

# ✅ Good ordering — pip install is cached unless requirements.txt changes
COPY requirements.txt .
RUN pip install --no-cache-dir -r requirements.txt
COPY . .
The difference between a 40-second rebuild and a 3-second one. Multiply that by a team rebuilding all day, and the savings stack up quickly.
The --no-cache-dir flag tells pip not to stash downloaded packages inside the image. While that cache is handy locally, it just eats up space in a Docker build.
Note: This Dockerfile is intentionally simple. It runs as root and uses a single build stage. For production, you’d add a non-root user, use multi-stage builds to trim the image, and include a
HEALTHCHECK. We’ll cover those upgrades soon.
Building the Image
docker build --tag fastapi-demo .Docker reads the Dockerfile, executes each instruction, and produces a tagged image:
docker images
# REPOSITORY     TAG       IMAGE ID       CREATED          SIZE
# fastapi-demo   latest    a3b8e2c91f4d   5 seconds ago    195MB
195MB — most of it from the Python runtime and system libraries in the slim base image. Use the full python:3.12 base, and you’re looking at over 1GB.
Running the Container
docker run --detach --publish 8000:8000 --name my-api fastapi-demoBreaking down the flags:
--detach(-d) — runs the container in the background--publish 8000:8000(-p) — maps port 8000 on your machine to port 8000 inside the container--name my-api— gives the container a memorable name instead of a random one
Test it exactly as before:
curl localhost:8000/health
# {”status”:”healthy”,”version”:”1.0.0”}
You get the same response as before — but now your app is running inside a container, with its own Python runtime, its own packages, and its own filesystem. Move this image to any Docker-equipped machine, and it will run exactly the same.
Debugging a Running Container
Containers aren’t black boxes. Docker hands you plenty of tools to peek inside and see what’s going on.
View logs:
docker logs my-api
# INFO:     Started server process [1]
# INFO:     Waiting for application startup.
# INFO:     Application startup complete.
# INFO:     Uvicorn running on http://0.0.0.0:8000
Follow logs in real time (like tail -f):
docker logs -f my-apiOpen a shell inside the running container:
docker exec -it my-api /bin/bashThis drops you right into the container’s filesystem. Poke around, check installed packages with pip list, inspect environment variables, test network connections — whatever you need to squash a bug. The -it flags give you an interactive terminal.
Get the full container details as JSON:
docker inspect my-apiThis spills out everything: network settings, volume mounts, environment variables and restart policies. Invaluable when something isn’t behaving as expected.
Stop and remove a container:
docker stop my-api
docker rm my-api
Or in one step: docker rm -f my-api.
Sharing Your Image
To share your image across a team or deploy it from CI, you’ll need to push it to a container registry — a remote home for Docker images.
Common registries include Docker Hub, GitHub Container Registry (GHCR), Amazon ECR, and Google Artifact Registry.
Let’s use GHCR as an example.
Step 1 — Log in:
docker login ghcr.io -u YOUR_GITHUB_USERNAME --password YOUR_PAT
# Login Succeeded
Step 2 — Tag your image with the registry path:
docker tag fastapi-demo ghcr.io/YOUR_USERNAME/fastapi-demo:1.0.0The tag format is registry/namespace/image-name:version. Always tag with a specific version — 1.0.0, or a Git commit hash.
Warning: Avoid
:latestin production — it’s a moving target that gets overwritten with every push. When things break at 2 AM,:latestleaves you guessing which version is actually running.
Step 3 — Push:
docker push ghcr.io/YOUR_USERNAME/fastapi-demo:1.0.0Or build and push in one shot:
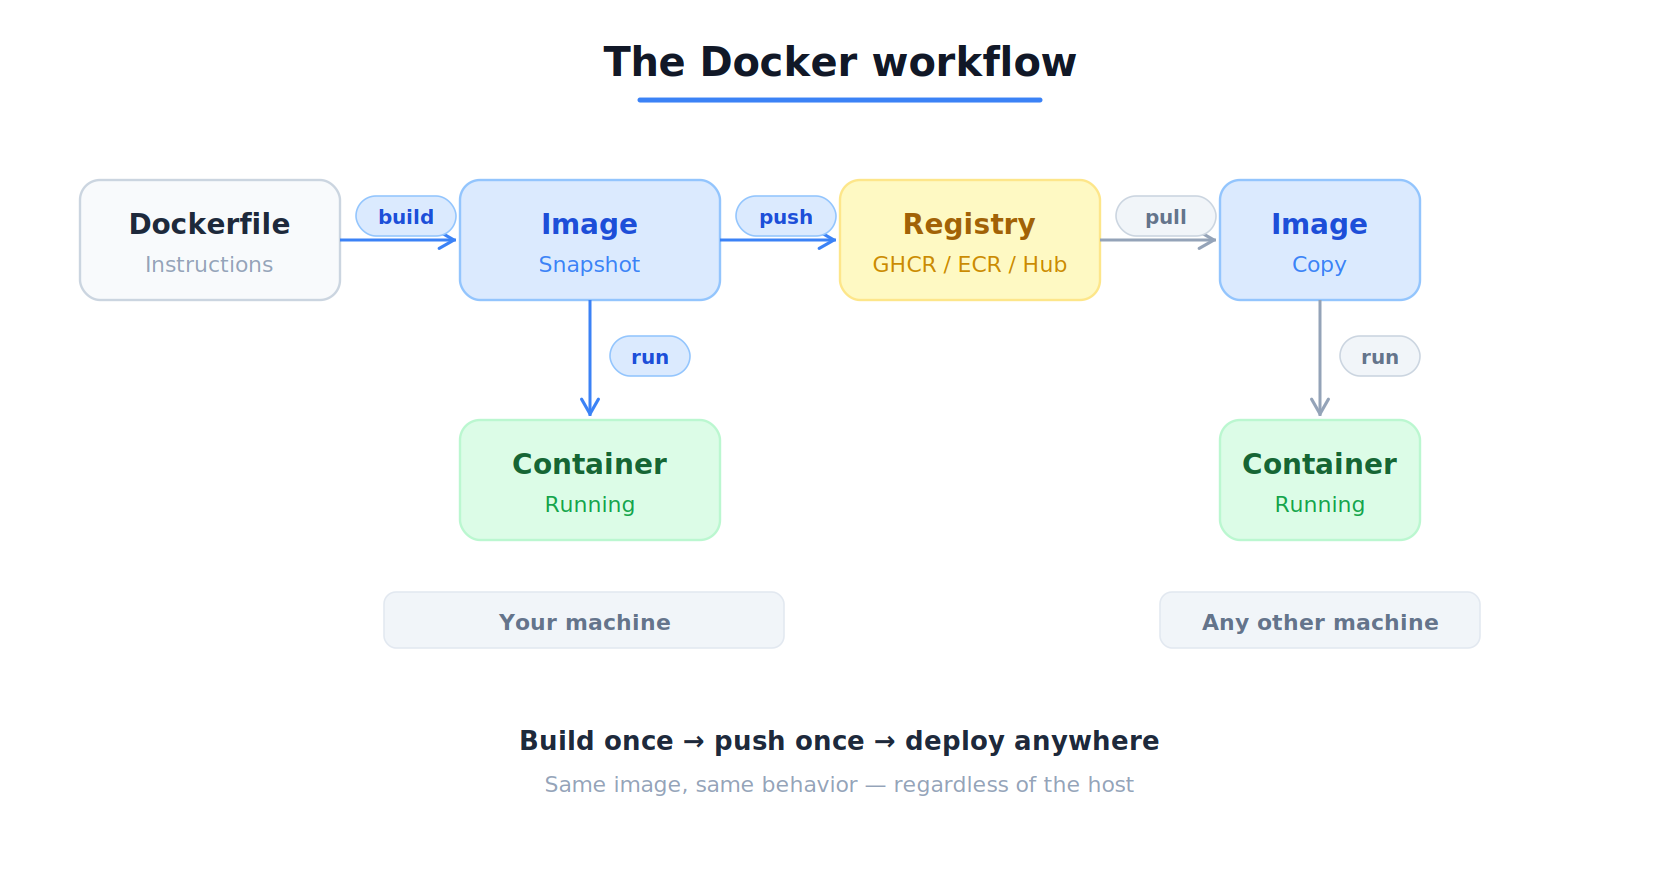
docker build -t ghcr.io/YOUR_USERNAME/fastapi-demo:1.0.0 --push .Your image now lives in the registry, ready to be pulled onto any machine or deployment environment. This is the foundation of CI/CD: build once, push once, deploy anywhere.
Best practice: Use pinned version tags instead of relying on
:latest.
What’s Next
This Dockerfile gets the job done, but it’s not ready for production. It runs as root, skips health checks, and doesn’t use multi-stage builds to reduce the image size.
In the next post, we'll dig deeper into — the kernel features behind container isolation. You’ll see how Docker builds private worlds, enforces resource limits, and why knowing this helps you debug real production problems.
Once you grasp what’s happening beneath docker run, Docker stops being a black box and becomes a tool you truly command.
Next up → Linux Namespaces & cgroups: How Docker Isolates Containers at the Kernel Level.